Create a Calc REST API with two AWS service integrations and one Lambda non-proxy integration
- Log in to to the IAM console.
- Choose Roles.
- Choose Create Role.
- Under Select type of trusted entity, choose AWS Service.
- Under Choose the service that will use this role, choose Lambda.
- Choose Next: Permissions.
- Choose Create Policy.A new Create Policy console window will open up. In that window, do the following:
- In the JSON tab, replace the existing policy with the following:
{ "Version": "2012-10-17", "Statement": [ { "Effect": "Allow", "Action": "lambda:InvokeFunction", "Resource": "*" } ] } - Choose Review policy.
- Under Review Policy, do the following:
- For Name, type a name such as
lambda_execute. - Choose Create Policy.
- For Name, type a name such as
- In the JSON tab, replace the existing policy with the following:
- In the original Create Role console window, do the following:
- Under Attach permissions policies, choose your
lambda_executepolicy from the dropdown list.If you don’t see your policy in the list, choose the refresh button at the top of the list. (Don’t refresh the browser page!) - Choose Next:Tags.
- Choose Next:Review.
- For the Role name, type a name such as
lambda_invoke_function_assume_apigw_role. - Choose Create role.
- Under Attach permissions policies, choose your
- Choose your
lambda_invoke_function_assume_apigw_rolefrom the list of roles. - Choose the Trust relationships tab.
- Choose Edit trust relationship.
- Replace the existing policy with the following:
{ "Version": "2012-10-17", "Statement": [ { "Sid": "", "Effect": "Allow", "Principal": { "Service": [ "lambda.amazonaws.com", "apigateway.amazonaws.com" ] }, "Action": "sts:AssumeRole" } ] } - Choose Update Trust Policy.
- Make a note of the role ARN for the role you just created. You’ll need it later.
- In the Lambda console, choose Create function.
- Choose Author from Scratch.
- For Name, enter
Calc. - Set the Runtime to a supported Node.js runtime.
- Choose Create function.
- Copy the following Lambda function and paste it into the code editor in the Lambda console.
console.log('Loading the Calc function'); exports.handler = function(event, context, callback) { console.log('Received event:', JSON.stringify(event, null, 2)); if (event.a === undefined || event.b === undefined || event.op === undefined) { callback("400 Invalid Input"); } var res = {}; res.a = Number(event.a); res.b = Number(event.b); res.op = event.op; if (isNaN(event.a) || isNaN(event.b)) { callback("400 Invalid Operand"); } switch(event.op) { case "+": case "add": res.c = res.a + res.b; break; case "-": case "sub": res.c = res.a - res.b; break; case "*": case "mul": res.c = res.a * res.b; break; case "/": case "div": res.c = res.b===0 ? NaN : Number(event.a) / Number(event.b); break; default: callback("400 Invalid Operator"); break; } callback(null, res); }; - Under Execution role, choose Choose an existing role.
- Enter the role ARN for the
lambda_invoke_function_assume_apigw_rolerole you created earlier. - Choose Save.
This function requires two operands (a and b) and an operator (op) from the event input parameter. The input is a JSON object of the following format:
{
  "a": "Number" | "String",
  "b": "Number" | "String",
  "op": "String"
}
This function returns the calculated result (c) and the input. For an invalid input, the function returns either the null value or the “Invalid op” string as the result. The output is of the following JSON format:
{
  "a": "Number",
  "b": "Number",
  "op": "String",
  "c": "Number" | "String"
}
You should test the function in the Lambda console before integrating it with the API in the next step.
- In the Saved test events dropdown menu, choose Configure test events.
- For the test event name, enter
calc2plus5. - Replace the test event definition with the following:
{ "a": "2", "b": "5", "op": "+" } - Choose Save.
- Choose Test.
- Expand Execution result: succeeded. You should see the following:
{
  "a": 2,
  "b": 5,
  "op": "+",
  "c": 7
}
The following procedure shows how to create an API for the Calc Lambda function you just created. In subsequent sections, you’ll add resources and methods to it.
Create the Calc API
- Sign in to the API Gateway console at https://console.aws.amazon.com/apigateway.
- If this is your first time using API Gateway, you see a page that introduces you to the features of the service. Under REST API, choose Build. When the Create Example API popup appears, choose OK.
If this is not your first time using API Gateway, choose Create API. Under REST API, choose Build. - Under Create new API, choose New API.
- For API Name, enter
LambdaCalc. - Leave the Description blank, and leave the Endpoint Type set to Regional.
- Choose Create API.
- In the API Gateway console, under your
LambdaCalcAPI’s Resources, choose /. - In the Actions drop-down menu, choose Create Resource.
- For Resource Name, enter
calc. - Choose Create Resource.
- Choose the /calc resource you just created.
- In the Actions drop-down menu, choose Create Method.
- In the method drop-down menu that appears, choose GET.
- Choose the checkmark icon to save your choice.
- In the Set up pane:
- For Integration type, choose AWS Service.
- For AWS Region, choose the region (e.g.,
us-west-2) where you created the Lambda function. - For AWS Service, choose Lambda.
- Leave AWS Subdomain blank, because our Lambda function is not hosted on any AWS subdomain.
- For HTTP method, choose POST and choose the checkmark icon to save your choice. Lambda requires that the
POSTrequest be used to invoke any Lambda function. This example shows that the HTTP method in a frontend method request can be different from the integration request in the backend. - Choose
Use path overridefor Action Type. This option allows us to specify the ARN of the Invoke action to execute ourCalcfunction. - Enter
/2015-03-31/functions/arn:aws:lambda:in Path override, whereregion:account-id:function:Calc/invocationsregionis the region where you created your Lambda function andaccount-idis the account number for the AWS account. - For Execution role, enter the role ARN for the
lambda_invoke_function_assume_apigw_roleIAM role you created earlier. - Leave Content Handling set to Passthrough, because this method will not deal with any binary data.
- Leave Use default timeout checked.
- Choose Save.
- Choose Method Request.Now you will set up query parameters for the GET method on /calc so it can receive input on behalf of the backend Lambda function.
- Choose the pencil icon next to Request Validator and choose Validate query string parameters and headers from the drop-down menu. This setting will cause an error message to return to state the required parameters are missing if the client does not specify them. You will not get charged for the call to the backend.
- Choose the checkmark icon to save your changes.
- Expand the URL Query String Parameters section.
- Choose Add query string.
- For Name, type
operand1. - Choose the checkmark icon to save the parameter.
- Repeat the previous steps to create parameters named
operand2andoperator. - Check the Required option for each parameter to ensure that they are validated.
- Choose Method Execution and then choose Integration Request to set up the mapping template to translate the client-supplied query strings to the integration request payload as required by the
Calcfunction.- Expand the Mapping Templates section.
- Choose When no template matches the request Content-Type header for Request body passthrough.
- Under Content-Type, choose Add mapping template.
- Type
application/jsonand choose the checkmark icon to open the template editor. - Choose Yes, secure this integration to proceed.
- Copy the following mapping script into the mapping template editor:
{
    "a":  "$input.params('operand1')",
    "b":  "$input.params('operand2')",
    "op": "$input.params('operator')"
}
This template maps the three query string parameters declared in Method Request into designated property values of the JSON object as the input to the backend Lambda function. The transformed JSON object will be included as the integration request payload.
- Choose Save.
- Choose Method Execution.
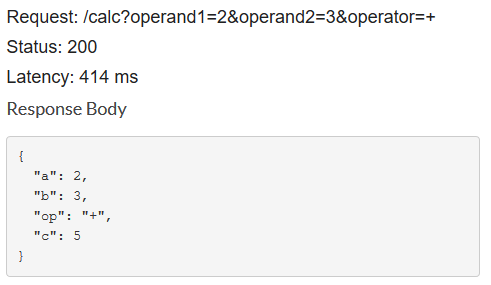
- You can now test your
GETmethod to verify that it has been properly set up to invoke the Lambda function:- For Query Strings, type
operand1=2&operand2=3&operator=+. - Choose Test.The results should look similar to this:
![Create an API in API Gateway as a Lambda proxy]()
- For Query Strings, type
-
Go to the API Gateway console.
-
Choose APIs.
-
Choose the LambdaCalc API you created previously.
-
Choose the /calc resource from Resources pane.
-
In the Actions menu, choose Create Method.
-
Choose POST from the method drop-down list.
-
Choose the checkmark icon to save your choice.
-
In the Set up pane:
-
For Integration type, choose AWS Service.
-
For AWS Region, choose the region (e.g.,
us-west-2) where you created the Lambda function. -
For AWS Service, choose Lambda.
-
Leave AWS Subdomain blank, because our Lambda function is not hosted on any AWS subdomain.
-
For HTTP method, choose POST. This example shows that the HTTP method in a frontend method request can be different from the integration request in the backend.
-
For Action, choose
Use path overridefor Action Type. This option allows you to specify the ARN of the Invoke action to execute yourCalcfunction. -
For Path override, type
/2015-03-31/functions/arn:aws:lambda:, whereregion:account-id:function:Calc/invocationsregionis the region where you created your Lambda function andaccount-idis the account number for the AWS account. -
For Execution role, enter the role ARN for the
lambda_invoke_function_assume_apigw_roleIAM role you created earlier. -
Leave Content Handling set to Passthrough, because this method will not deal with any binary data.
-
Leave Use Default Timeout checked.
-
Choose Save.
-
-
Choose Models under your LambdaCalc API in the API Gateway console’s primary navigation pane to create data models for the method’s input and output:
-
Choose Create in the Models pane. Type
Inputin Model name, typeapplication/jsonin Content type, and copy the following schema definition into the Model schema box:{ "type":"object", "properties":{ "a":{"type":"number"}, "b":{"type":"number"}, "op":{"type":"string"} }, "title":"Input" }This model describes the input data structure and will be used to validate the incoming request body.
-
Choose Create model.
-
Choose Create in the Models pane. Type
Outputin Model name, typeapplication/jsonin Content type, and copy the following schema definition into the Model schema box:{ "type":"object", "properties":{ "c":{"type":"number"} }, "title":"Output" }This model describes the data structure of the calculated output from the backend. It can be used to map the integration response data to a different model. This tutorial relies on the passthrough behavior and does not use this model.
-
Locate the API ID for your API at the top of the console screen and make a note of it. It will appear in parentheses after the API name.
-
In the Models pane, choose Create.
-
Type
Resultin Model name. -
Type
application/jsonin Content type. -
Copy the following schema definition, where
restapi-idis the REST API ID you noted earlier, into the Model schema box:{ "type":"object", "properties":{ "input":{ "$ref":"https://apigateway.amazonaws.com/restapis/restapi-id/models/Input" }, "output":{ "$ref":"https://apigateway.amazonaws.com/restapis/restapi-id/models/Output" } }, "title":"Output" }This model describes the data structure of the returned response data. It references both the
InputandOutputschemas defined in the specified API (restapi-id -
Choose Create model.
-
-
In the main navigation pane, under your
LambdaCalcAPI, choose Resources. -
In the Resources pane, choose the
POSTmethod for your API. -
Choose Method Request.
-
In the Method Request configuration settings, do the following to enable request validation on the incoming request body:
-
Choose the pencil icon next to Request Validator to choose
Validate body. Choose the checkmark icon to save your choice. -
Expand the Request Body section, choose Add model
-
Type
application/jsonin the Content-Type input field and chooseInputfrom the drop-down list in the Model name column. Choose the checkmark icon to save your choice.
-
-
To test your
POSTmethod, do the following:-
Choose Method Execution.
-
Choose Test.
-
-
Copy the following JSON payload into the Request Body:
{ "a": 1, "b": 2, "op": "+" } -
Choose Test.
You should see the following output in Response Body:
{
  "a": 1,
  "b": 2,
  "op": "+",
  "c": 3
}
- Go to the API Gateway console.
- Under APIs, choose the LambdaCalc API you created previously.
- In the API’s Resources navigation pane, choose /calc.
- From the Actions drop-down menu, choose Create Resource.
- For Resource Name, type
{operand1}. - For Resource Path, type
{operand1}. - Choose Create Resource.
- Choose the /calc/{operand1} resource you just created.
- From the Actions drop-down menu, choose Create Resource.
- For Resource Name, type
{operand2}. - For Resource Path, type
{operand2}. - Choose Create Resource.
- Choose the /calc/{operand1}/{operand2} resource you just created.
- From the Actions drop-down menu, choose Create Resource.
- For Resource Path, type
{operator}. - For Resource Name, type
{operator}. - Choose Create Resource.
- Choose the /calc/{operand1}/{operand2}/{operator} resource you just created.
- From the Actions drop-down menu, choose Create Method.
- From the method drop-down menu, choose
GET. - In the Setup pane, choose
Lambda Functionfor Integration type, to use the streamlined setup process enabled by the console. - Choose a region (e.g.,
us-west-2) for Lambda Region. This is the region where the Lambda function is hosted. - Choose your existing Lambda function (
Calc) for Lambda Function. - Choose Save and then choose OK to consent to Add Permissions to Lambda Function.
- Choose Integration Request.
- Set up the mapping template as follows:
- Expand the Mapping Templates section.
- Leave set to When no template matches the requested Content-Type header.
- Choose Add mapping template.
- Type
application/jsonfor Content-Type and then choose the check mark icon to open the template editor. - Choose Yes, secure this integration to proceed.
- Copy the following mapping script into the template editor:
{
   "a": "$input.params('operand1')",
   "b": "$input.params('operand2')",
   "op": #if($input.params('operator')=='%2F')"/"#{else}"$input.params('operator')"#end

}
This template maps the three URL path parameters, declared when the /calc/{operand1}/{operand2}/{operator} resource was created, into designated property values in the JSON object. Because URL paths must be URL-encoded, the division operator must be specified as
%2Finstead of/. This template translates the%2Finto'/'before passing it to the Lambda function. - Choose Save.
When the method is set up correctly, the settings should look more or less like this:
![]()
- To test your
GETfunction, do the following:- Choose Method Execution.
- Choose Test.
- Type
1,1and+in the {operand1}, {operand2} and {operator} fields, respectively. - Choose Test.
- The result should look like this:
![Map a method request URL path parameters to the integration request payload to call the Lambda function]()
This test result shows the original output from the backend Lambda function, as passed through the integration response without mapping, because there is no mapping template. Next, you’ll model the data structure of the method response payload after the
Resultschema. - By default, the method response body is assigned an empty model. This will cause the integration response body to be passed through without mapping. However, when you generate an SDK for one of the strongly-type languages, such as Java or Objective-C, your SDK users will receive an empty object as the result. To ensure that both the REST client and SDK clients receive the desired result, you must model the response data using a predefined schema. Here you’ll define a model for the method response body and to construct a mapping template to translate the integration response body into the method response body.
- Choose /calc/{operand1}/{operand2}/{operator}.
- Choose GET.
- Choose Method Execution.
- Choose Method Response.
- Expand the 200 response,
- Under Response Body for 200, choose the pencil icon next to the model for the
application/jsoncontent type. - From the Models drop-down list, choose
Result. - Choose the checkmark icon to save your choice.
Setting the model for the method response body ensures that the response data will be cast into the
Resultobject of a given SDK. To make sure that the integration response data is mapped accordingly, you’ll need a mapping template. - To create the mapping template, do the following:
- Choose Method Execution.
- Choose Integration Response and expand the 200 method response entry.
- Expand the Mapping Templates section.
- Choose
application/jsonfrom the Content-Type list. - Choose
Resultfrom the Generate template drop-down list to bring up theResulttemplate blueprint. - Change the template blueprint to the following:
#set($inputRoot = $input.path('$')) { "input" : { "a" : $inputRoot.a, "b" : $inputRoot.b, "op" : "$inputRoot.op" }, "output" : { "c" : $inputRoot.c } } - Choose Save.
- To test the mapping template, do the following:
- Choose Method Execution.
- Choose Test.
- Type
12and+in the operand1, operand2 and operator input fields, respectively.The integration response from the Lambda function is now mapped to aResultobject. - Choose Test, and you’ll see the following under Response Body in the console:
{
  "input": {
    "a": 1,
    "b": 2,
    "op": "+"
  },
  "output": {
    "c": 3
  }
}
- At this point the API can be called only via Test Invoke in the API Gateway console. To make it available to clients, you’ll need to deploy it as follows:


Comments are closed, but trackbacks and pingbacks are open.